Comparing and contrasting basic additive processes
Scott Orlosky | July 12, 2023Humans have been using both additive and subtractive processes to make useful objects for tens of thousands of years. We just didn’t have the same terms for those processes as we do today. Some prehistoric examples of subtractive processes would include flint knapping to produce arrow points and wood carving to create log boats. On the additive side, we could look at processes such as forming clay into cups or large storage vessels; building dwellings out of stacked logs or adobe bricks; or weaving to create baskets or cloth.
Clearly these processes are very different from what we think of today as additive and subtractive processes, so what is it that makes the difference? Mainly, the modernization of these processes has eliminated manual activity in favor of electromechanical control. This, in turn, allows for more precision, faster operation and less variability regardless of the operator. These three attributes have made manufacturing processes widely available to all. Subtractive processes are referred to as machining, while additive processes, the focus of this article, are called 3D printing, or just printing. Additive machines are a relatively new manufacturing technique. As such, the cost of these machines continues to decline and new variations proliferate. This can be confusing when it comes to figuring out which type to buy. In truth it’s an iterative process. The first part of the decision tree is to determine the physical attributes that you need in the finished part. This article will guide you over the three most common types of 3D printers.
Fused deposition modeling (FDM)
 Figure 1: Fused deposition modeling (FDM).
To produce prototypes that will help in visualizing or testing the fit of mating parts, or production tooling or fixturing, then FDM is probably the most suitable approach. FDM machines are a precision version of a glue gun attached to an X-Y plotter. The plastic material is in the form of a filament wound on a spool and it is fed through the center of the “hot end". FDM varies in the types of plastic that can be used based on the temperatures they can achieve. The part is produced by successively depositing a bead of plastic, building up a part layer by layer. This is the most common type of 3D printer and the one that most people are familiar with.
Stereolithography (SLA)
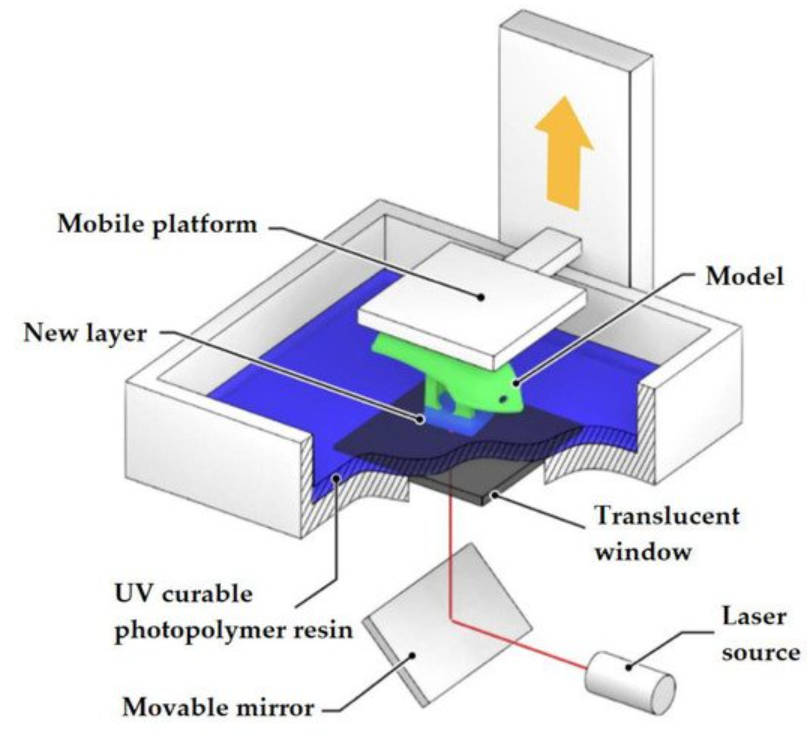 Figure 2: Stereo lithography (SLA).
If you want a step up in performance and need better surface finishes, faster printing, a wider array of material choices or need to produce clear models of designs, then look to stereolithography printers. These work by using an ultraviolet (UV)-activated plastic resin in a liquid form. A build plate starts off level with the liquid surface and a UV laser creates the part layer by layer. The laser causes the resin to solidify. Then the build plate moves up a small increment and the laser fuses the next layer to the previous layer. This process repeats until the part is complete. Since it uses a laser, this process results in more precise models and cleaner surface finishes.
Selective laser sintering (SLS)
Lastly, to produce metal parts or tough and resilient nylon parts, or some specialty (hybrid) materials, then selective laser sintering is the way to go. This process starts with a fine-grained powder of the chosen metal or plastic. The laser traces the outline of the part, melting (sintering) the material grains as it goes. The build plate then moves incrementally downward and a scraper moves across the build area to backfill the gap with more powder. The next layer is sintered to the one below it and the process continues until the part is fully fabricated. Often an SLS machine is designed to handle only plastics or metal. Though the process is the same, the mechanics of the sintering process are different between plastics and metals.
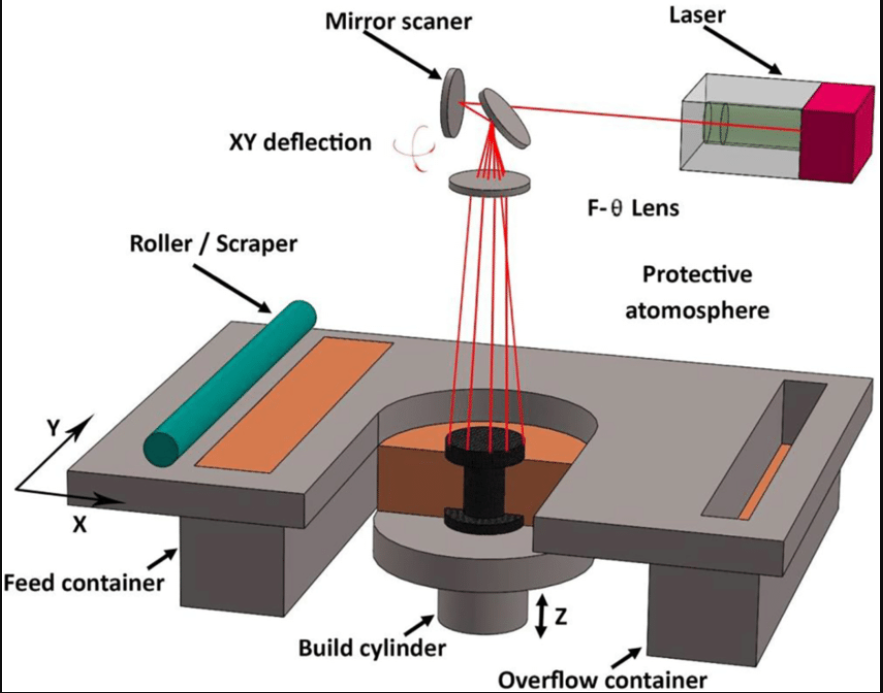 Figure 3: Selective laser sintering (SLS).
Once the characteristics of the desired parts are determined, the rest of the selection process is usually determined by the cost of the equipment, the volume required based on the size of parts to be produced and the ultimate cost per part. Pricing for the 3D printer itself is only part of the story. FDM machines are around $1,000, SLA machines fall in the range of $5,000 to $10,000 and SLS machines are around $10,000 and above. However, regardless of which printer type is selected, if you have enough volume usage then the cost per part becomes negligible from a capital investment point of view. In that case, the cost per part; material, plus set-up and labor cost dominates.
One of the overlooked costs with the FDM and the SLA processes is that the material used often requires that auxiliary structures are built into the model so that the part will hold its shape properly during the part formation. This requires more time in developing the CAD model that is actually printed. These auxiliary structures can be made of a different material from the finished part (in the case of FDM) and be washed or dissolved after the part is finished and cooled. Alternatively, the supports can be designed to have specific breakaway locations so they can be separated from the main structure by hand at the end. Regardless of the technique, these models often require a significant bit of hands-on work to clean up the model and give it a finished appearance. They can also produce significant scrap. SLA processes have a similar requirement for supporting structure, but those are offset by the fact that the SLA process is generally faster and since it is more precise, any supports can have much more defined break-away points, leaving a cleaner finished look. SLS has probably the lowest cost per part, since the parts are fully supported by the powder during fabrication, and it is easy to nest multiple parts in one run. Once finished, the parts have to be dug out of the powder by hand, brushed off, and then they are ready for use. Unfused powder can be easily recovered and re-used.
This is a quick overview to help in determining what might be the best equipment to match your needs. As mentioned before, it is an iterative process. Fortunately, with many machines to choose from, it is likely that the right combination of features is out there. Take the time to learn the options available, get a true assessment of your needs and make an informed choice. In the end, you’ll be glad you did.
About the author
Scott Orlosky has an MS in Manufacturing and Control Theory from the University of California at Berkeley and has worked over 30 years designing, developing, marketing and selling sensors and actuators for industrial and commercial industries. He has written numerous articles and application notes for speed and position sensors used in industrial and hazardous area environments including an author credit in “Encoders for Dummies.” Scott authored an industrial newsletter for nearly 15 years and is also co-inventor on a number of patents involving design and manufacturing of inertial sensors.